
Stem wall repair is crucial for older buildings, addressing settlement or moisture damage that can lead to ceiling and floor support issues if left unchecked. Identifying cracks early, utilizing professional tools for evaluation, and choosing appropriate materials like hydraulic cement or epoxy are key steps. Meticulous preparation, including cleaning and following manufacturer instructions, ensures the longevity of repairs. Quality materials, proper techniques, and regular maintenance prevent future damage from water intrusion or poor drainage. Post-repair, enhance aesthetics with design elements while maintaining a clean, sealed finish for long-lasting results.
Cracked walls, especially in older buildings, often reveal a deeper issue: stem wall damage. This structural problem requires meticulous restoration for both safety and aesthetic purposes. Understanding stem wall damage, its causes, and types is the first step. Assessing repair needs, choosing the right materials, and following a comprehensive guide ensures successful restoration.
From best practices to common mistakes to avoid, this article equips you with knowledge for effective stem wall repair, enhancing your space’s longevity and beauty.
Understanding Stem Wall Damage: Common Causes and Types
Stem wall damage, often overlooked, is a common issue in older buildings and homes. Understanding the causes and types of stem wall problems is crucial for effective restoration and prevention. This structural element, typically made of concrete or brick, supports the ceiling and upper floors, making it vital to address any cracks or deteriorations promptly.
The most common causes include settlement issues, where the building’s foundation moves differently than the walls, leading to cracks. Moisture intrusion, whether from broken pipes or inadequate waterproofing, can also cause stem wall damage over time. Types of stem wall repairs range from minor crack filling to complete replacement, depending on the severity and extent of the damage. Early detection through regular inspections is key to mitigating these issues, ensuring longevity, and maintaining the structural integrity of your property.
Assessing the Extent of Repair Needed
When considering cracked wall restoration, assessing the extent of repair needed is a crucial first step. This involves meticulously examining the damage to determine whether it’s confined to cosmetic cracks or if there are structural issues requiring stem wall repair. Close inspection can reveal hidden damage, such as weakened joints or instability in the foundation, which must be addressed for lasting repairs.
Professional inspectors often use specialized tools and techniques to gauge the severity of cracks and identify potential causes. This thorough evaluation ensures that only necessary repairs are undertaken, saving time and money while promoting effective wall restoration. Proper assessment is key to selecting appropriate solutions, whether it’s filling minor cracks with mortar or implementing more intensive stem wall repair methods.
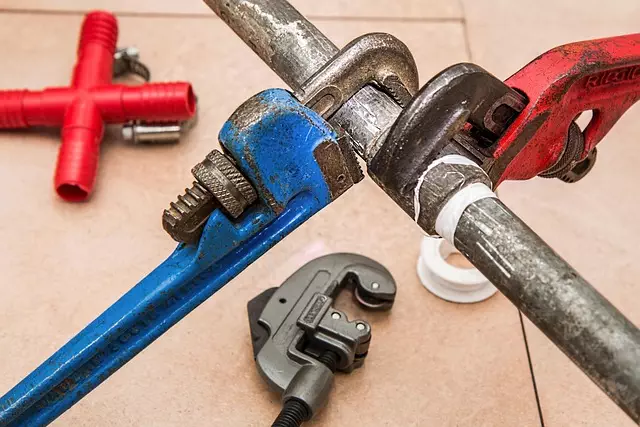
Materials and Tools for Effective Stem Wall Repair

When undertaking stem wall repair, the choice of materials and tools is paramount for achieving effective results. For cracks ranging from minor defects to more significant structural issues, a combination of products designed for durability and flexibility is ideal. Hydraulic cement, for instance, is a popular choice due to its ability to set quickly and fill gaps while also resisting water penetration—a must-have trait for exterior walls. For larger cracks, an epoxy injection system can provide deeper penetration and superior bond strength, ensuring the repair holds firm over time.
Essential tools include a hammer, chisel, and wire brush for initial preparation; these help to clean the crack and ensure the surface is free from debris. A trowel is crucial for applying the chosen material accurately, while protective gear such as gloves and safety goggles are essential for user safety. Additionally, a pressure washer may be needed to thoroughly clean the wall before repair, especially in areas with heavy buildup or vegetation.
Step-by-Step Guide to Restoring Cracked Walls

Restoring cracked walls, whether due to age, structural issues, or accidents, involves a meticulous process known as stem wall repair. Here’s a step-by-step guide to help you achieve a sturdy and aesthetically pleasing result:
1. Inspect and Prepare: Begin by thoroughly examining the damaged area. Remove loose debris and dust with a vacuum cleaner. Clean the crack to ensure proper adhesion for the repair materials. If necessary, use a chisel and hammer to widen the crack’s opening slightly, as this allows for better bonding of the filler.
2. Choose the Right Materials: Select a stem wall repair compound suitable for your project. These compounds are designed to mimic the original wall material and provide structural support. Ensure it’s compatible with your existing walls and follows manufacturer instructions for mixing. For larger cracks, consider incorporating mesh reinforcement for added strength.
Best Practices for Ensuring Longevity of Repairs

When restoring cracked walls, especially stem wall repair, the key to longevity lies in meticulous preparation and using suitable materials. Before beginning any repairs, thoroughly clean the area to remove loose debris and dust, ensuring a clean surface for new materials to adhere to. This step is crucial as it prevents future contamination and weakens the bond between the repair and the existing wall.
Choosing the right products is equally important. Opt for high-quality, weatherproof compounds designed specifically for stem wall repair, which can withstand environmental factors. Properly sealing the repaired area with a waterproof membrane further enhances durability, protecting against moisture intrusion that could compromise the repairs. Regular maintenance, including periodic inspections and prompt repair of any new cracks, will contribute to the overall longevity of the restoration work.
Common Mistakes to Avoid During Stem Wall Restoration

When restoring a stem wall, homeowners and contractors often make mistakes that can compromise the structural integrity and long-term durability of the repair. One common error is using subpar materials or improper techniques, which may lead to future cracks and leaks. It’s crucial to opt for high-quality, durable stem wall products and follow established construction guidelines. Using the wrong type of mortar or failing to properly prepare the surface can also cause issues, ensuring the new material adheres effectively.
Another mistake to avoid is neglecting proper drainage and moisture management. Stem walls should be designed with adequate weep holes and flashing to direct water away from the structure. Ignoring this crucial aspect can result in water damage, leading to further problems like mold growth and weakened structural support. Always remember that meticulous planning, using the right materials, and adhering to construction best practices are key to successful stem wall repair.
Incorporating Design Elements for Enhanced Aesthetics

When restoring cracked walls, especially after a stem wall repair, it’s an opportunity to enhance the aesthetics as well as structural integrity. Incorporating design elements can transform a plain wall into a stunning feature. Consider adding textures like architectural molds or subtle patterns that mimic historical styles for a touch of elegance. Paint finishes can also play a significant role; a textured or distressed finish adds depth and character, making the wall an eye-catching focal point.
Moreover, integrating decorative elements such as shelves, artwork, or even lighting can elevate the space. These additions not only improve the visual appeal but also provide practical functionality. A well-restored cracked wall with thoughtful design choices can become a conversation starter and contribute to the overall ambiance of the room.
Final Touches and Maintenance Tips for Future Reference

After completing the stem wall repair and allowing the adhesive or mortar to set properly, it’s time to add the final touches that will restore your cracked wall to its former glory. Begin by meticulously cleaning the area, removing any dust or debris left from the repair process. This ensures a smooth finish and prevents future issues. Next, apply a thin layer of high-quality sealer or paint designed for walls, matching the existing color as closely as possible. Allow this final coat to dry completely before putting any furniture back against the wall or using it in your space.
For ongoing maintenance and future reference, establish a regular cleaning routine. Dusting and vacuuming will help keep the repair area free from debris and allow you to spot any new cracks early on. Additionally, periodically check for signs of moisture damage or further weakening of the wall. Addressing these issues promptly prevents more extensive repairs down the line, ensuring your restored stem wall remains in excellent condition for years to come.